iTunes Listening Stats

I always have a hard time choosing favorite songs or bands so I usually default to my current addiction. Right now that happens to be Chimp Spanner. Recently I decided to try to analyze my listening habits a little bit more and figure out what bands have really stuck with me.  iTunes keeps track of a decent amount of listening information and makes this very accessible so I thought it would be interesting to use this to calculate some stats. To do this, I wrote a Python script that parses the iTunes music library file and gets statistics on what artists and albums I listen to the most.

Parsing the iTunes music library file in Python turned out to be pretty easy. It is stored as a property list which can be completely parsed using the standard python library plistlib. Plistlib stores the whole file as a dictionary so access is fast and easy. I simply had to iterate through the dictionary and pull the information I needed.

As it turns out I have spent about 84 days listening to my music over the last 3 years or so. I have 28,000 plays and my most listened to bands along with their total listening time and percentage of all iTunes music listening are:

Top played artists by time
| Symphony X                   | 11:7:55:57.489  | 13.35% |
| Nightwish                    | 10:13:17:58.603 | 12.43% |
| Queens of the Stone Age      | 5:18:2:32.704   | 6.78%  |
| Cloud Cult                   | 5:8:53:43.777   | 6.33%  |
| Kamelot                      | 3:22:2:50.529   | 4.62%  |
| Dethklok                     | 2:14:23:1.718   | 3.06%  |
| Arjen A. Lucassen's Star One | 2:14:15:51.818  | 3.06%  |
| Muse                         | 2:12:40:48.849  | 2.98%  |
| Blind Guardian               | 2:12:29:12.134  | 2.97%  |
| Leaves' Eyes                 | 2:8:5:58.55     | 2.75%  |

I pretty much just listen to a lot of power metal. Probably the most interesting result from this is how much I am willing to listen to the same stuff on repeat. This script is currently living at Github if you want to try it out. It should run without modification on any Mac and will run on PC if you change the path to the iTunes Music Library XML file.

Let me know what your results are!

Run-Time Analysis Using MatPlotLib

In my algorithms classes I was always disappointed that there was no coding involved. We wrote out lots of pseudo code, but never anything more tangible. I decided to code up some of the algorithms for fun and to solidify the differences between run-times for the algorithms we were working on. This direct comparison helped a lot with my understanding of the algorithms, but the problem I kept having was it was kind of difficult to visualize the results. I wanted something that would let me run my algorithms in whatever language I wanted and just spit out a nice graph of the results. I decided to make a tool to do this and the result is pyGraph.

How it works

PyGraph is a simple script made to easily graph the output of any program in real time. It takes another program as an argument and reads through the output to determine what information to graph. PyGraph uses MatPlotLib from the SciPy toolkit to construct the graphs. The way values are graphed is by prefixing each printed value with “#>” followed by the label on the graph, and then the x and y coordinates. For example:

#>Algorithm1,10,10
#>Algorithm2,12,15
#>Algorithm1,11,11
#>Algorithm2,14,17

This example would create two bars, one called Algorithm1, one called Algorithm2 as well as two points for each algorithm. Any number of labels can be created so I’m not limited to comparing just two algorithms. The title of the graph as well as the x and y axis can be specified in a similar way.

#>Title,Closest Point
#>xAxis,Number of Points
#>yAxis,Time in Seconds

An important note is that this method requires that stdout needs to be flushed every so often otherwise the graph will not update. The examples in the Github repository show how to do this in Python and C++.

Example

One of the problems we covered in my algorithms class is the closest pair of points problem. The goal is given a set of points, find the two points that are closest together. Wikipedia has a great description of this problem as well as an overview of both algorithms I have implemented. The Brute force algorithm has a run-time of O(n^2) while the divide and conquer approach as a run-time of O(n logn).

Closest Pair of Points Graph

There are plenty of other uses for this little script other than run-time analysis and the uses should expand as I add new features. Let me know if you are interested in adding anything! Check out pyGraph on Github.

Tarsier, Inc. MoveEye Demo Video

For roughly the last year and half I have been working at Tarsier, Inc (www.TarsierInc.com) developing a new technology called MoveEye. MoveEye uses sensors built into 3D glasses to track gestures from the user’s perspective. This is a unique approach that I think will play an important role in shaping future human-computer interaction.

Currently most major gesture recognition technologies revolve around a sensor that has a fixed field of view. For example, the Kinect or the Leap Motion are usually set up to observe a certain area and watch for various gestures within this space. This allows for powerful interaction, but it is missing a key piece of information that greatly increases the expressive power of the gestures: point of view.

When the user’s perspective is known it can be determined exactly what the user is trying to interact with no matter where they are. One only has look at the screen they wish to interact with. Relative gestures (similar to the Kinect or Leap Motion paradigm) can be still be used while non-relative gestures can be used to interact directly with objects on the screen. This key difference allows anyone to interact with a screen in an intuitive way as long as they can see the screen. In my experience I would describe the interaction as being similar to using a touch pad.

This new paradigm has proven difficult to explain without seeing it in action. To help resolve this issue we put together a demo video showcasing MoveEye. This video is really only a small taste of what we know is possible using this paradigm, but I think it does a good job of showing the foundation.


Testing out the Leap Motion

Recently I got the opportunity to try out a Leap Motion and play around with SDK that is currently only available to select developers. I am borrowing it from a friend of mine who is one of the lucky people that made it into the developer program. It is an impressive piece of hardware. It is extremely small and light weight, the frame rate is really high and it is incredibly accurate. Before I happened to meet someone who would let me borrow theirs, I had a lot of questions about how it worked and development so I thought I would share what I’ve learned.

The Leap Motion. The three reddish lights are the infrared LEDs.

The Leap Motion. The three reddish lights are the infrared LEDs.

Overview of the Technology

The basic idea behind the Leap Motion is a very well implemented version of stereo vision. Stereovision sensors use two cameras much like two eyes. By determining the distance between two objects in the two images (called the disparity) and the distance and orientation between the two cameras, one can determine how far an object is. It is actually very difficult to do robustly and quickly so this type of depth sensor has not gained as much attention until recently. Leap must have made a few breakthroughs in this area to get it to be so fast and accurate.

The big difference between a standard stereovision set up and the Leap Motion is the use of Infrared cameras and I assume, an infrared filter. When the device is running you can see three red lights inside the unit which illuminate in infrared up to a short distance away from the unit. This would be beneficial because the background (or at least anything more than a couple feet away) would already be subtracted from the view of the Leap Motion so far less processing needs to be done. It only has to determine depths for your hands or any tools in the display rather than every single point in the image and then have an additional algorithm to segment out the foreground. Beyond this improvement it is tough to say exactly how their algorithm works to be able to run so fast. They are doing a good job of keeping that part under wraps.

Basic Viewer, Speed Measurements, and Gestures:

When I opened up the basic viewer I was getting frame rates around 90 FPS and a latency around 4 ms on a 2010 MacBook Pro with an i7. Processor usage is around 50% on one core. The latency tends to climb a bit as the scene gets busier, but I couldn’t ever get it above 10ms. I don’t really have a good way to test whether that measurement is accurate, but it definitely feels like that is the case. I don’t notice any lag when I am using it. These speeds are achieved using the USB 2.0 connection. With the USB 3.0 connection the frame rate jumps to around 200 FPS.

The current gestures and visualizations built into the Leap Motion are:

  • Swipe (a quick swipe in a certain direction)
  • Making a circular motion
  • Poke and tap (depends on whether it is a quick motion forwards or up and down)
  • A visualization that shows the size of a virtual ball that roughly conforms to how open your hand is
  • A disk representing your hand showing which side of your hand is the top or bottom. It appears it makes this decision based on your fingers. When I held my thumb in my hand rather than outside it sometimes would get confused

Unfortunately the SDK does not currently support point clouds, but Leap Motion is promising developers that this piece of functionality will be available in the future. Instead the way your hand is depicted is much simpler to work with from an application development standpoint. Each finger is represented by a point and a vector as shown in the image below. The point is the tip of your finger while the vector represents the direction your finger is pointing.

Leap Motion Visualizer

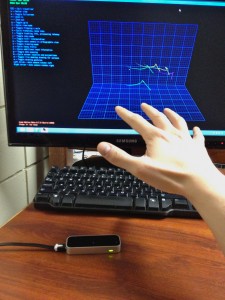
The simple visualizer that comes with the Leap Motion SDK

Leap Motion SDK

Getting the SDK the setup was really easy and installing the software went without any issues on either Mac or Windows. My Mac seemed to reject the USB cable they shipped with it, but when I tried a new cable it worked fine. Lately Leap has been releasing updates to developers every couple of weeks so the SDK will likely be dramatically different by the time it ships in July. In the current version, the SDK contains several examples which I will get into later and is available for c++, c#, objective c, Java, Python, and Javascript.

So far I have only used the C++ version of the SDK. The SDK is specified by one header files that is documented very well and only requires one dynamically linked library. Much effort seems to have gone into making sure that the information that is exposed to developers is very clear. The header is about 3000 lines long and the vast majority of that is extremely detailed explanations of every function. After only looking at the header file for a few minutes I had a very good understanding of how to use it. The library works by having your app override several virtual functions that are callbacks for various events such as a new frame, Leap Motion connected, and Leap Motion disconnected. The frame gives you access to the important information such as hands, tools, and gestures. After this point, the way you use that information is up to you.

Finals Thoughts

After using the Leap Motion for a while I am really curious to see what other developers are able to come up with. I am currently working on a team that is building an app for launch for creating music that will be pretty cool, but at the same time, I am having a hard time seeing a “killer app” that will make Leap be an indispensable new form of human computer interaction. Hopefully I will be proven wrong as the Leap Motion is a really cool piece of hardware. Some code examples and demos should be coming soon!

First Blog Post!

I have been thinking about it for some time and now I finally got a website to mess around on. I’ve been wanting to get one so I can keep a portfolio of sorts for all of the random projects I work on. Having a nice platform to help other people out as well as show off what I have done a bit will hopefully be a good motivator to actually finish and polish up my work. I tend to get really excited about random cool technology and spend a lot of time learning about each of these interests. Currently I have been spending a lot of time playing with the Kinect as well as other gesture recognition technologies, hacking musical instruments and music software to customize them or create unique sounds, and learning how to use various microcontrollers and SOCs (system on a chip) like Arduino or Gumstix.

Some of these projects took a long time to get started on for a variety of reasons. Often the instructions to set up a programming environment weren’t complete or the documentation was difficult to jump into as a beginner. I want to be able to provide some good tutorials and if nothing else, provide another possible source to help someone find the obscure error that is standing in the way of getting a Kinect up and running or a Gumstix to stream video. Also, having some detailed notes will be very beneficial for me when I suddenly decide to try the new Ubuntu beta or something like that and have to get everything up and running again.

Right now I am pretty busy with school, but now that I have my first post out of the way I will start going through my backlog and documenting what I have done. I will also be working on getting this site to look a little cleaner and be a little more functional. Expect to see some cool posts on the Leap Motion, Kinect, Gumstix, and ukuleles soon!